Sunday 23 July 2017


Jio Phone, Free with Unlimited 4G Data, Launched by Mukesh Ambani at Reliance AGM

  
Jio Phone, Free With Rs. 1,500 Deposit, Unlimited 4G Data, Launched by Mukesh Ambani at Reliance AGM

HIGHLIGHTS

  • Reliance Jio announced its feature phone on Friday
  • Plans start at Rs. 153 with unlimited data, voice, and SMS
  • You pay Rs. 1,500 for the phone, which is fully refundable after 3 years

JioPhone made a splash at the Reliance AGM on Friday as Mukesh Ambani took the covers off the long-rumoured 4G feature phone. The handset, introduced as "India ka Smartphone" and launched at an "effective price" of Rs. 0 (though buyers will have to shell out a refundable, upfront deposit of Rs. 1,500 for the device). JioPhone will be crucial for the company in tapping the estimated 50 crore feature phone users who have not been able to join the Jio 4G bandwagon because of the high costs associated with smartphones.

Although Reliance Jio launched in India in September, the company's offering has been restricted to smartphone users as it is a 4G only network, and to make calls, a phone has to support the VoLTE technology, which is usually not found on basic phones. The company aims to change that with the JioPhone, which comes with 4G VoLTE support. The JioPhone will include access to apps like JioCinema, JioTV, and JioMusic.

JioPhone release date and other availability details

The phone will be available from August 15 - for testing, in beta, and will be up for pre-booking from August 24 from the MyJio app and Jio offline stores. Users who pre-book will be able to buy the phone from September, on a first come first serve basis. It will come with a couple of different data packs.

JioPhone plans

Users can either pay Rs. 153 per month, for which they will get free voice and SMS, and unlimited data (high-speed data FUP is 500MB per day), along with Jio apps. They can also choose to pay Rs. 309 per month to get all this, plus the support for mirroring your screen on a TV, via a cable that can even be plugged into CRT TVs. After three years, you can return the phone, and get a full refund on the deposit. Aside from that, the company will also have two sachet packs, at Rs. 24 for two days, or Rs. 54 per week, for users who don't want to commit to Rs. 153 as an upfront payment.

JioPhone features and specifications

The JioPhone was introduced by Akash and Isha Ambani, revealing the phone’s support voice commands, along with standard feature phone functionality. Isha Ambani said that the phone looks familiar by design, to ensure that it is easy to use. The phone comes with a number of apps and browser installed aside from Jio’s offerings too. On stage, we caught glimpses of the JioPhone browser, Facebook, and also PM Modi’s Mann Ki Baat broadcast.

JioPhone Specifications Features Launched Mukesh Ambani JioPhone Specs Specifications price Features

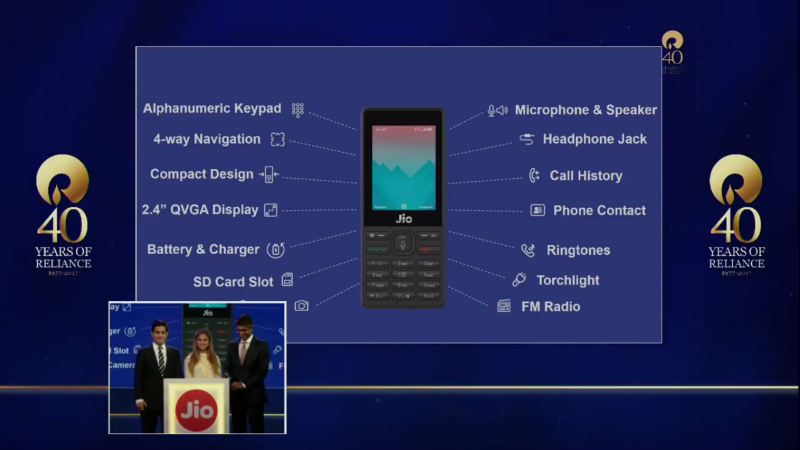
JioPhone features revealed at Reliance AGM


The company will also be adding NFC support to the JioPhone to allow tap and pay solutions with a linked bank account, Akash Ambani said. This will also support UPI payments, and debit and credit card payments, similar to Samsung Pay, he said. The company confirmed the phone will have a 2.4-inch display, panic button, expandable storage, and FM radio, among other features. 

"There are 78 crore mobile phones in India," Mukesh Ambani pointed out. "However, in this 78 crore, there are more than 50 crore feature phone users, who have been left out. They can neither afford the cheapest LTE smartphone, nor the exorbitant cost of data."

"Data is the oxygen of digital life, and no Indian should suffer because of unaffordability," he added. "Sadly the vast majority of mobile users are starved of data. This unfairness must end, and Jio is committing to ending it today."

To accomplish this, the company needs to deliver on three pillars, Ambani said - connectivity, data affordability, and device affordability. "Jio is a data strong network built for the Internet from the ground up," he said. "The TRAI speedtest portal has consistently ranked Jio as the clear 4G network leader in coverage, usage, and data speeds."

"Our network continues to rapidly expand. Jio, in the next 12 months, will cover 99 percent of the population. India's 4G coverage will be more than its 2G coverage," he added. To meet the need for device affordability, the company realised it would have to release a 4G VoLTE feature phone, as even an entry level smartphone costs between Rs. 3,000 and Rs. 4,500, Ambani said.
Jio Phone

Jio Phone

Thursday 4 May 2017

    How to Compress PDF Files and Reduce Size


HIGHLIGHTS

  • Online tools can pose a security risk
  • Adobe Acrobat's PDF optimise feature is paid-only
  • macOS' Preview has built-in option
Here’s a task we’ve all faced at some point in our lives – having to compress a PDF, be it to fit an arbitrary file size requirement, optimise for quick viewing, or save on data costs. There are several ways to go about doing so, depending on your platform, privacy needs, and how much time you have.

Online tools to compress PDF files for free

While this compression method is the easiest of the lot, it also presents the largest security risk, since your PDF file will be uploaded to the website’s servers. As a rule, you should completely avoid using free online tools for documents that contain personal, identifiable information, such as your Aadhaar, passport, and the like. On the other hand, if the information in the document is available to the public, the lack of privacy and security might not be a problem.
In such cases, you can look at one of the many options out there to compress your PDF file, with some of the popular ones being SmallpdfiLovePDF, and PDF Compressor. Given an uncompressed 24MB document with words and images, the first three services performed about the same, giving out compressed PDF files around 1.12MB, 1.10MB, and 1.6MB respectively. With an alternative 5.55MB PDF, the results came to 319KB, 316KB, and 434KB.

In terms of user interface, Smallpdf looks like the best PDF file compression online service, but it restricts you to two files per hour, without payment. PDF Compressor is great if you need to convert multiple files in one go, as it's the only one that allows selecting more than one file at a time.
Even then, you should rely on a service that carries a citation from a trusted authority. In the absence of a recommendation, it’s worth reading into the site’s privacy policy, and legal terms of use – such as this.
After you’ve done your share of research, the process to actually compress the PDF file(s) is similar for most websites:
  • Open the website, and select the PDF files you want to upload. On some websites, you might be able to drag and drop files.
  • Wait for the website to compress files, and then locate the download button. While some websites will let you directly download the files, others may send it to your email address.

Compress PDF files on Android and iOS

All the above online tools work across both computers and mobile devices. On Android, you can pull up PDF files from internal storage or cloud services on the file selection stage. With iOS, the PDF files must be stored on a supported cloud service - Dropbox, Google Drive, and the like. While some websites will hand you a zip file, others will open the compressed PDF right in your browser, which you can then send via the usual means.

Compress PDF files using Adobe Acrobat

Adobe Acrobat Reader DC is a free PDF reader, but the PDF optimisation feature is available only as part of the paid Acrobat Pro subscription. If you’re willing to pony up more than a thousand bucks a month, here’s how it works:
  • Open the PDF file in Adobe Acrobat.
  • Click Tools > Optimise PDF.
  • From the toolbar that appears above the PDF, choose Reduce File Size.
  • To get more control, head into Advanced Optimisation. Then click Audit space usage to see what page elements are taking up how much space.
  • Once you’re satisfied, press OK.
  • Go to File > Save As, and make a copy.

Compress PDF files for free on Windows

There are several free Windows software apps that will compress PDFs. One popular option is 4Dots Free PDF Compress, which supports everything from Windows 7, 8.1, and 10. There are two ways to use it.
Here’s how to compress PDF files using this Windows software via the right-click menu:
  • During installation, allow 4Dots to hook into Windows’ right-click menu.
  • Then locate the PDF file, and right-click on it.
  • Choose Compress PDF.
Alternatively, you can reduce PDF size by opening the app:
  • Open 4Dots Free PDF Compress.
  • Click *Add button, and select the files. You can also drag and drop them onto the app.
  • Select output folder, image quality, and hit Compress.

Compress PDF files for free on macOS

On macOS, you don’t need to download any app. The in-built Preview app can reduce file size of PDFs.
Here’s how to compress PDF files for free on Mac OS:
  • Open a PDF in Preview - for most people just double-clicking on the PDF file should do just that.
  • Select File > Export.
  • Under the Quartz Filter option, choose Reduce File Size.
  • Choose export location, and click save.
Have you faced any trouble reducing PDF file size? Leave your questions in the comments below.

Saturday 22 April 2017

How to Use Google Authenticator App to Secure Your Gmail Account

 
How to Use Google Authenticator App to Secure Your Gmail Account

HIGHLIGHTS

  • Two-factor authentication is an important security feature
  • You should enable it on all of your online accounts
  • You can use an authenticator app or get OTPs via SMS
Two-factor authentication is a needlessly complex sounding name for a very simple way to secure your email, social media, and most other online accounts. While two-factor authentication technically means you have two layers of security protecting your account - typically, one a password, and the second is usually a one-time password (OTP). So most people who talk about two-factor authentication are usually taking about OTPs.
Once you’ve enabled this additional layer of security on your account, you’ll get an OTP via text message or an authenticator app whenever you login to your Gmail or Twitter account, for instance. This means even if someone finds out what your password is, they won’t be able to log in to your account because they won’t have access to the one-time password.
It’s always good to have an extra layer of security when it comes to online accounts. Every other day we hear about people’s accounts being hacked online and enabling two-factor authentication is one way to make things difficult for miscreants.

Where to use two-factor authentication

Not all sites support two-factor authentication, but we think you should use this security feature on every single site that supports it. Sure, it adds an extra step while you are logging in to your online accounts but remember that it’s also protecting your account.
If you don’t want to use this everywhere, we suggest that you definitely enable it on all of your email accounts. As long as your email isn’t compromised, most of your online accounts are also going to be safe. It goes without saying that you might want to avoid email providers such as Yahoo, which aren’t exactly known for providing a good level of security.

How to use Google Authenticator app to add two-factor authentication

There are two primary ways to use two-factor authentication - text message or via an authenticator app. Most sites will send you OTPs via text message and that’s a perfectly good method of authentication. However if you go abroad or travel to a place with patchy or no network within your country, then you could be locked out of your account because the SMS will never arrive.
That is why we recommend using authenticator apps such as Google Authenticator, Microsoft Authenticator, or Authy or even some password managers such as 1Password. These apps show you OTPs even if the smartphone is in airplane mode. Google Authenticator is quite easy to use and the following steps will show you how to use it for Gmail. The steps are similar for other authenticator apps too.
google authenticator app setup sc Google Authenticator
  1. Open Google’s two-factor authentication page.
  2. Enter your password as and when prompted. You’ll reach the landing page for two-factor authentication. Click Get Started.
  3. Enter the phone number you want to use for OTP. This is just in case the authenticator app isn’t accessible. Click Next.
  4. Enter the one-time password sent to your phone. Click Next.
  5. Click Turn on.
  6. This enables two-factor authentication via SMS on your Google account. Now scroll down and click Setup under Authenticator app.
  7. In the pop-up, select the type of phone you have - Android or iPhone.
  8. Now you’ll see a QR code on screen. You can either scan this or click Can’t scan it to get a code for two-factor authentication. This is where you’ll have to switch to your smartphone.
  9. Download Google Authenticator on Android or iOS.
  10. Tap Begin Setup.
  11. Tap Scan barcode. This will fire up the camera on your smartphone and you can point that at the QR code on the computer screen. Alternatively you can tap Manual entry and enter the code on screen.
  12. On the Google two-factor authentication page, click Next.
  13. Enter the code on your authenticator app and click Verify.

Thursday 13 April 2017

How to Search by Image on Google

 
How to Search by Image on Google

HIGHLIGHTS

  • Google’s Search by Image feature lets you find similar images
  • You can upload a picture or paste a URL to search
  • It also helps you check if an image has been copied by other sites
Everyone knows how to use Google Image Search that lets you quickly find images on the Internet. But not everyone knows about search by image, that can help you in a wide variety of cases. Sometimes you want to search for the sources of images, or maybe you have an image on your computer or found one online, and you want a high-resolution version or want to check if someone has posted it online. Or perhaps you want to check the authenticity of the latest WhatsApp forward you received. Or you have a picture of a table, and you'd like to buy the same one; or you've seen a picture of a cartoon character you are not able to recognise. These are all scenarios where Google’s Search by Image tool can be handy.
We’ve used search by image feature multiple times to check if people have pasted our images on other websites. We’ve also been using it to look for images similar to the ones we find online or some that are stored on our computer. Google’s search by image works quite well and often you’ll find a much better high-resolution version of the image you have, which is always good news.
Follow these steps to search by image on Google on desktop:
  1. Open Google’s Search by Image page.
  2. Click the camera icon in the search box.
  3. Now you can paste the URL of the image you’ve found online and click Search by image.
  4. Alternatively you can click Upload an image, then Choose File. This lets you upload any image stored on your computer.
  5. Once the image is uploaded, you’ll see results for similar images, webpages that have those images, and you can click on More sizes to find the same image in different resolutions.
You can also search by image on your smartphone but there is a small workaround involved if you want to access all features. By default, the mobile version of the search by image page doesn’t show the camera icon mentioned above. Follow these steps and you won’t face that issue.
safari ios 10 request desktop site Safari
  1. Open Google’s Search by Image page.
  2. Now you need to find the Request desktop site feature in your browser.
  3. On Safari, hit the Share icon and scroll to the right in the bottom row. Tap Request Desktop Site.
  4. On Google Chrome, tap the three vertical dots on the top-right and tap Request Desktop Site. Look for similar feature in other browsers. As long as your browser has this feature, the following steps will help you search by image on Google.
  5. Now you will see the desktop version of the Search by Image page.
  6. Tap the camera icon in the search box and from there, the steps to search by image on Google are the same as the desktop version.
  7. If you click Upload an image and then Choose file on a smartphone, you can even click a photo and search for it on Google.
google chrome google image search sc Google Image Search
If you use Google Chrome browser on Android or iOS, there is one more way to search by image on Google, if the image you want to use is already on another website.
  1. Launch Google Chrome on iOS or on Android.
  2. Open any webpage with an image, such as an article in Google Chrome.
  3. Tap and hold any image on the article. In the pop-up, select Search Google for this image.
  4. This will show where the image has been used on the Internet.
  5. You can also tap More sizes to find high-resolution versions of the same image.

Tuesday 11 April 2017

Jio Dhan Dhana Dhan Offer: Reliance Jio Offers 1GB Data Per Day for 3 Months at Rs. 309

  
Jio Dhan Dhana Dhan Offer: Reliance Jio Offers 1GB Data Per Day for 3 Months at Rs. 309

HIGHLIGHTS

  • Reliance Jio's new offer provides 3 months usage with a one-time recharge
  • Tariffs for the Jio Dhan Dhana Dhan offer are Rs. 309 and Rs. 509
  • Non-Jio Prime users can also avail the benefits at an extra cost
After cancelling the Jio Summer Surprise offer due to a TRAI order, Reliance Jio has launched the Jio Dhan Dhana Dhan offer that provides three months of usage with a one-time payment. With the new promotional offer, Jio users need to do just one recharge to avail services – including unlimited data, free SMSs, Jio apps subscription, and of course free voice calls – for three recharge cycles of 28 days. Under the Jio Dhan Dhana Dhan offer, the Rs. 309 and Rs. 509 recharge packs for Jio Prime members will provide 1GB and 2GB of 4G data per day, respectively, apart from other benefits mentioned earlier.

Jio Dhan Dhana Dhan offer

The Jio Dhan Dhana Dhan offer is aimed at customers who were unable to avail the Jio Summer Surprise offer benefits before it was pulled officially, as well as new customers. In order to get the benefits of the new offer, users need to subscribe to Jio Prime membership plan and buy the Rs. 309 or Rs. 509 recharge by April 15 in order to "to avoid degradation and/ or discontinuation of services." Those who are already part of the Jio Summer Surprise promotion will not get the benefits of Jio Dhan Dhana Dhan offer, but then they are already enjoying 3 months of 'free' usage.
Jio Prime users will be able to get the free Reliance Jio services for three months with the Rs. 309 and Rs. 509 recharges. Customers who are yet to sign up for Jio Prime or who are new users will have to buy the Rs. 408 (Rs. 99 Jio Prime subscription + Rs. 309 pack) or Rs. 608 (Rs. 99 + Rs. 509) recharge in order to get the free services for three cycles of 28 days. Once you buy the recharge, you can use Reliance Jio services for 84 days (3 x 28 days). The tariffs are only marginally more expensive than the original recharge values of Rs. 303 and Rs. 499 for the 1GB and 2GB data benefits, respectively.
The Jio.com website and MyJio app show that the actual tariffs for the Rs. 309 and Rs. 509 recharge are Rs. 349 and Rs. 549, but the operator is giving a Rs. 40 discount at present.
Ads by ZINC
One major difference between the Jio Dhan Dhana Dhan offer and the summer offer is that customers had the option to buy recharges of Rs. 999 or higher values - which provided no daily FUP - with the latter, but there seems to no such option on the Jio website right now.
In a statement, Reliance Jio said, "With this [offer], Jio extends the benefits of a superior and advanced technology to take India to global digital leadership. The announcement also marks another step in Jio’s commitment to continuously delight its customers and enable them to live a fully digital life."
Reliance Jio promised to withdraw the Jio Summer Surprise offer after the Telecom Regulatory Authority of India (TRAI) said that it should be pulled as it does not comply with the existing regulatory framework. The country's youngest telco on Thursday agreed to cancel the offer, but continued enrolments till four days later. However, with the Jio Dhan Dhana Dhan offer, customers will be able to continue enjoying the free services till June, the same as users of Jio Summer Surprise offer users.

How to Link PAN With Aadhar Card

  
How to Link PAN With Aadhar Card

HIGHLIGHTS

  • You can link your Aadhaar and PAN via the e-filing website
  • For this to work, your PAN and Aadhaar details need to match
  • In case of a discrepancy, you will soon be able to link via OTP
Linking Aadhaar to your PAN for filing taxes is no longer optional. If you're trying to figure out how this is supposed to work, you've come to the right place. The good news is that linking PAN with Aadhar card is extremely simple to do. The option to add your Aadhaar to your income tax form alongside the PAN has been around for a couple of years now, which was brought in as a way by which people could easily verify their forms.
Head over to the Income Tax e-filing portal and follow these steps to link Aadhar to PAN:
Ads by ZINC
  1. If you're new, then you'll need to click on Register Here and then enter your PAN details, and then create a password after verifying the OTP.
  2. If you have your credentials, click on Login here so you can link your PAN to Aadhar.
  3. Enter your PAN for User ID, the password, and the Captcha code, then click on Login.
  4. A popup window should appear asking you to link your Aadhaar. Enter your Aadhaar number, and the Captcha, and then click on Link now.
  5. In case you didn't see the popup window, you can still enter the details easily. Click on Profile Settings in the top menu.
  6. Next, find Link Aadhaar.
  7. Enter your Aadhaar number and click on Save to continue.
This will only work if the details on the PAN and the Aadhaar card match. However, the government has talked about ways that would make it easier to link your PAN card and Aadhaar card in case of discrepancies, by letting you upload a scan of your PAN card, or register via OTP on your linked mobile number. These options don't appear to be active yet, but are expected to be available soon.
That's all there is to it right now. Did this guide help you in linking your PAN to your Aadhaar card? Let us know via the comments, and check out the rest of our How-to articles.

Sunday 9 April 2017

Micromax Dual 5 to Go on Sale in India Today

  
Micromax Dual 5 to Go on Sale in India Today

HIGHLIGHTS

  • Micromax Dual 5 sports a dual rear camera setup
  • It bears two 13-megapixel rear sensors; one RGB, one monochrome
  • It comes with a Rs. 24,999 price tag
Micromax Dual 5, the company's first in its Dual series, sports a dual rear camera setup. It's set to go on sale in India on Monday, via Flipkart and the company's online store. Micromax Dual 5 price is Rs. 24,999, and it will also be made available via offline stores.
The company has used two 13-megapixel Sony IMX258 sensors, one for monochrome light and the other for RGB (colour), featuring an f/1.8 aperture. The Micromax Dual 5 camera also captures video at 4K UHD resolution, while the company is touting 3D video functionality thanks to the dual rear cameras.

On the front, the Micromax Dual 5 sports another 13-megapixel camera, with a 1.12-micron pixel Sony IMX258 sensor. It bears an f/2.0 aperture and features a soft selfie flash module. Other front camera features include an integrated SmartBeauty mode, gesture control, and a GIF maker.
Ads by ZINC
The Micromax Dual 5 is claimed to be built from a single slab of aircraft-grade aluminium. Micromax is also boasting of an additional customisable key, and the integration of a panic button (used by pressing the power button thrice).
The Android 6.0.1 Marshmallow-based Micromax Dual 5 bears a 5.5-inch full-HD (1080x1920 pixels) Super AMOLED 2.5D curved display with Corning Gorilla Glass 3 protection and a 100 percent NTSC colour gamut. It is powered by a Qualcomm Snapdragon 652 MSM8976 SoC (4 Cortex-A72 cores clocked at 1.8GHz and 4 Cortex-A53 cores clocked at 1.4GHz) coupled with 4GB of RAM.
The smartphone sports a fingerprint sensor on the rear panel that is claimed to recognise prints in up to 0.2 seconds. The Dual 5's fingerprint sensor functions as a selfie key and offers other gestures controls, and a 360-degree acceptance angle. It also powers the Secure Vault feature of the phone. The company is also touting a SafeSwitch feature that is meant to prevent loss of data upon theft.
The Micromax Dual 5 bears 128GB of inbuilt storage, and users can expand it via microSD card (up to 128GB) in a hybrid dual-SIM card configuration. Connectivity options include 4G VoLTE, Wi-Fi 802.11ac, Bluetooth v4.1, 3.5mm audio jack, and USB Type-C. Sensors on board include accelerometer, ambient light sensor, gyroscope, infrared sensor, and proximity sensor. It sports a 3200mAh battery with Quick Charge 3.0. It weighs in at 164 grams.

Display

5.50-inch

Processor

1.4GHz octa-core

Front Camera

13-megapixel

Resolution

1080x1920 pixels

RAM

4GB

OS

Android 6.0

Storage

128GB

Rear Camera

13-megapixel

Battery Capacity

3200mAh